Ring Of Death

The red
ring of death sometimes has a very simple fix that doesn't require any
disassembly of your Xbox 360. Before assuming that your Xbox needs
repair or has to be sent back to Microsoft, you should rule out the
simple stuff first. This page will provide a troubleshooting procedure to do just that.
For those who are unfamiliar with the term, the red ring of death refers to the three quarter circle of red lights that flash around the power button whenever your Xbox 360 malfunctions.
Find out why this happens, what you must do before you get your console repaired, and finally how you can repair your Xbox yourself and whether you should.
Something You Need to Know Before Proceeding Further:
 OPENING UP YOUR CONSOLE WILL VOID YOUR WARRANTY.
If you have an expired warranty or have already worked inside of your console, then there's nothing to lose now. Otherwise you need to think about this first.
Make Sure That You Actually Have The Red Ring of Death
 If
flashing red lights are a new experience for you, make certain that you
count three red lights (see picture to the right). Four red lights also
form a red ring but it is not the red ring of death. A brief
description of the other error codes including the four red light error
are given here.
If
flashing red lights are a new experience for you, make certain that you
count three red lights (see picture to the right). Four red lights also
form a red ring but it is not the red ring of death. A brief
description of the other error codes including the four red light error
are given here. So Why Does the Red Ring of Death Happen in the First Place?
Causes for the Red Ring of Death

Photo by Pablasso.
There are two broad reasons why your Xbox 360 will flash the red ring of death:
1.) When the console doesn't get adequate power. There are a number of ways that this can happen but it can be easily identified and fixed without opening the console.
2.) An overheating Xbox. When this happens, the Xbox is designed to shut itself down. Sometimes it does so before any damage occurs but not always. If no damage has happened, then avoiding the red ring of death comes down to avoiding overheating. How this is done will be described further down in the troubleshooting section.
If damage has taken place, then you will have to make use of your warranty if you have one or you will have to do some repair work. (See the "repairing your Xbox" section below).
The reason for the overheating is a combination of design issues as well as improper usage of the Xbox. Components within the Xbox (primarily the GPU and CPU) use a lot of power and consequently generate a lot of heat. The cooling system is barely able to keep up with this.
It doesn't take much to cause your Xbox to overheat. Just a bit of improper usage on the part of the owner will do this. Sometimes it will overheat regardless of how well you treat it.
An in depth explanation of the design problems that contribute to the red ring of death are explained as follows:
1. Heat
Xbox 360 heat is excessive.
The Xbox 360 design has several
high-power components that occupy a small space. Now, high-power
components (the CPU and GPU in particular) also put out high amounts of
heat. The console deals with this by using heat sinks, vents, and fans
to dissipate this heat. Because there isn't much cooling capacity in
reserve, this system easily overheats if the needed airflow into the
Xbox 360 gets obstructed. When the heat levels get high enough, assorted
design flaws start to act up leading to the red ring of death.
Heat Sinks
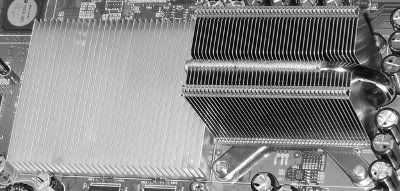
2. Lead free solder
Xbox 360 solder is brittle.
 Although
many adults use the Xbox 360, it's also used by children. This is why
lead free solder was used in it's manufacture. One major drawback to
this is that lead free solder is more brittle. Long term exposure to
heat and warpage of the motherboard stresses the solder which can cause
micro cracks to form. These cracks weaken solder joints which may break
over time. The cracks also affect the flow of electricity.
Although
many adults use the Xbox 360, it's also used by children. This is why
lead free solder was used in it's manufacture. One major drawback to
this is that lead free solder is more brittle. Long term exposure to
heat and warpage of the motherboard stresses the solder which can cause
micro cracks to form. These cracks weaken solder joints which may break
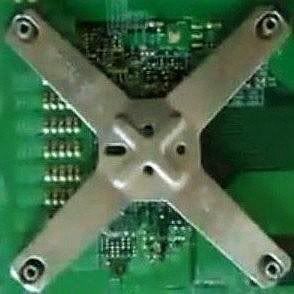
over time. The cracks also affect the flow of electricity. 3. Flawed heat sink clamp design
Xbox 360 heatsink clamp causes motherboard to flex.
The X clamp is a questionable design
because the clamp presses down with a non uniform force. This uneven
pressure gets more intense when the GPU and CPU get hot, which makes the
motherboard bend and flex. Lead free solder joints that are very
brittle are stressed with the flexing action of the motherboard. When
this stress is repeated over time the solder joints snap.
X-Clamp
4. Thermal Paste Issues
The Thermal Paste Often Fails
 One
common cause for many ring of death failures is bad thermal paste
connecting the CPU and the GPU to their respective heat sinks. High
quality paste that is properly applied should last for years. Poor
quality paste can break down in months. Improperly applied paste can
cause immediate problems. In the past, Microsoft has accidentally left
foil on the heat sinks. This foil renders the thermal paste useless.
Improper thermal paste application during manufacture is possible.
One
common cause for many ring of death failures is bad thermal paste
connecting the CPU and the GPU to their respective heat sinks. High
quality paste that is properly applied should last for years. Poor
quality paste can break down in months. Improperly applied paste can
cause immediate problems. In the past, Microsoft has accidentally left
foil on the heat sinks. This foil renders the thermal paste useless.
Improper thermal paste application during manufacture is possible. 5. Deficient Manufacturing Process: Soldering Temperature Was Too Low
Xbox solder process was sub-optimal.
The soldering process during manufacture
was done at too low a temperature. When lead free solder is under
heated, the resulting solder joint is full of voids and other defects.
These weak joints won't hold up for long even under normal
circumstances. If you include the other Xbox faults such as running too
hot and warping of the motherboard, you've got the perfect formula for
failure.
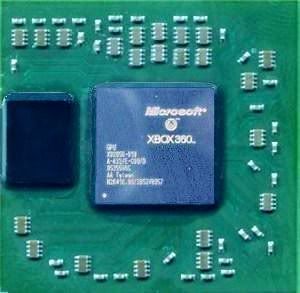
6. The Graphics Chip Puts Out Too Much Heat
Instead of going to an experienced
vendor for its chip design (ASIC vendor), Microsoft designed the
graphics chip in house, in other words, on it's own. They did this in
order to save some tens of millions of dollars in the cost of the
design.
Although Microsoft has some experience here, it doesn't come close to the level of expertise of the ASIC vendors. As a result, their graphics chip is inefficient in that it dissipates too much waste heat.
This problem dovetails in with the weak cooling system in the console.
Microsoft has gone to an ASIC vendor in the US and had the graphics chip redesigned. This move goes a long way to resolving the overheating problem.
However, there are lots of Xbox units in use that still have the old graphics chip. These will continue to be susceptible to heating problems.
Graphics Processing Unit
Troubleshooting Tips for the Red Ring of Death
Xbox troubleshooting before you do repair.
 If
you are thinking of getting your Xbox repaired either by yourself or by
a repair service, please try out the trouble shooting tips below first.
These don't involve opening the console and are easy to do. You should
also try these tips before using your warranty as well. No sense in
doing the packing and shipping and being without your Xbox when the
problem could have been quickly solved on your own. I don't want to get
your hopes up here but you never know, these tips may do it for you.
If
you are thinking of getting your Xbox repaired either by yourself or by
a repair service, please try out the trouble shooting tips below first.
These don't involve opening the console and are easy to do. You should
also try these tips before using your warranty as well. No sense in
doing the packing and shipping and being without your Xbox when the
problem could have been quickly solved on your own. I don't want to get
your hopes up here but you never know, these tips may do it for you.If the first tip doesn't help, then proceed to the next and so on.
1.) Restart The Console
 Yes,
this seems a bit silly but depending on where you live and the time of
year, electrical brown outs can happen especially in hot weather when
everyone has their air conditioner running. A momentary dip in
electrical power can trigger the ring of death.
Yes,
this seems a bit silly but depending on where you live and the time of
year, electrical brown outs can happen especially in hot weather when
everyone has their air conditioner running. A momentary dip in
electrical power can trigger the ring of death. 2.) Reconnect All Cables And Power Cords
 You
may have a loose cable or cord. Any cables and power cords that can be
removed should be disconnected. Unplug the power cable from the wall
plug. Firmly reattach all cables and cords back into the console. Now
connect up the power and turn on the console.
You
may have a loose cable or cord. Any cables and power cords that can be
removed should be disconnected. Unplug the power cable from the wall
plug. Firmly reattach all cables and cords back into the console. Now
connect up the power and turn on the console.If you notice any damaged cables or cords, replace them.
3.) Reconnect The Hard Drive
 Turn
off the console, unplug the power and then disconnect the hard drive.
Now plug back into the power and turn the console back on. If the
console does not show the three red lights error, turn it off and
disconnect the power cord from the wall. Finally, reconnect the hard
drive, plug in the power, and turn on the console.
Turn
off the console, unplug the power and then disconnect the hard drive.
Now plug back into the power and turn the console back on. If the
console does not show the three red lights error, turn it off and
disconnect the power cord from the wall. Finally, reconnect the hard
drive, plug in the power, and turn on the console. 4.) Bypass All Electrical Impediments
 If
you are using a surge protector, plug strip, or extension cord, remove
them and plug the power brick directly into the wall. Surge protectors
can be defective and long extension cords will reduce the power
available to your power hungry Xbox.
If
you are using a surge protector, plug strip, or extension cord, remove
them and plug the power brick directly into the wall. Surge protectors
can be defective and long extension cords will reduce the power
available to your power hungry Xbox. 5.) Use A Wall Outlet In A Different Room
 Your
wall outlet may not have adequate power. You can rule out this
possibility by trying your Xbox on a different wall outlet that's on a
different circuit. This usually means in a different room (but not
always).
Your
wall outlet may not have adequate power. You can rule out this
possibility by trying your Xbox on a different wall outlet that's on a
different circuit. This usually means in a different room (but not
always). 6.) Resolve Any Power Brick Issues
 The
power brick may be overheating. When this happens, it doesn't supply
the required power to your Xbox which triggers the ring of death. It
won't run cool unless it gets adequate ventilation. Keep it off of shag
carpeting. Don't place it on your bed covers or sheets.
The
power brick may be overheating. When this happens, it doesn't supply
the required power to your Xbox which triggers the ring of death. It
won't run cool unless it gets adequate ventilation. Keep it off of shag
carpeting. Don't place it on your bed covers or sheets.Another possibility is that the power brick is defective. If you have a spare or can borrow one from a friend, try it out.
7.) Your Xbox Must Run Cool
 If
you think that your machine has overheated, then turn it off and let it
cool down. Ensure that the cooling vents are not blocked in any way and
keep your Xbox 360 in a ventilated and open area.
If
you think that your machine has overheated, then turn it off and let it
cool down. Ensure that the cooling vents are not blocked in any way and
keep your Xbox 360 in a ventilated and open area.Verify that the fans are actually running.
Do not place it near any sources of heat. There are obvious sources like heaters and radiators and such. But less obvious sources include the electrical devices that are sitting on top or beneath your Xbox. Direct sunlight can also heat up your Xbox.
Try removing any dust buildup on the vents.
Cool off your console with a small fan.
Keep the rear of the console clear. Don't push it up against a wall and keep any debris away. This includes not allowing any cords and cables to get all bunched up in this area.
Don't do any all day gaming marathons. Limit your gaming to just a few hours, then turn it off and let it cool down for a while. The warmer the room temperature is the shorter your playing time should be.
XBox 360 Cooling Systems
Xbox cooling devices
If the above cooling suggestions
weren't enough, there are plenty of external cooling devices designed
for the Xbox 360 being sold on Amazon.
If all else has failed...Repairing Your XBox
The James Dean 3Red Light Fix
If you're still having problems after
trying the above suggestions, getting your machine repaired is the next
step. All Xboxes experiencing the ring of death have had their
warranties extended for three years beyond the purchase date. If you
have opened up your console this warranty is void.
If you're not used to working with your hands, then sending your Xbox back to Microsoft is the safest way to go. For most people this is worth the few weeks of waiting before getting their Xbox back. It doesn't make sense to do otherwise unless you're feeling comfortable about doing the repair yourself.
For those who are inclined to take matters into their own hands, the quickest and cheapest option is to repair it yourself using this guide. If you can follow directions, it's fairly simple to do. My sister recently repaired her kid's Xbox.

This guide will fix these problems:
Freeze ups
Distorted Graphics
2 red lights error
3 red lights error (ring of death)
E74 Error - this is the error where you get text on the screen saying E74
The fix will take you 40 mins to do and you do not need any special equipment just a screwdriver set and a few household items. It has a full set of videos and a guide to take you through each step with ease. It assumes that you are a complete novice, not one single item or process is left out. There is a customer service that you can contact to answer any questions that you may have.
If you do this fix following the videos you will have a working xbox. The fix is permanent.
If you're not used to working with your hands, then sending your Xbox back to Microsoft is the safest way to go. For most people this is worth the few weeks of waiting before getting their Xbox back. It doesn't make sense to do otherwise unless you're feeling comfortable about doing the repair yourself.
For those who are inclined to take matters into their own hands, the quickest and cheapest option is to repair it yourself using this guide. If you can follow directions, it's fairly simple to do. My sister recently repaired her kid's Xbox.
This guide will fix these problems:
Freeze ups
Distorted Graphics
2 red lights error
3 red lights error (ring of death)
E74 Error - this is the error where you get text on the screen saying E74
The fix will take you 40 mins to do and you do not need any special equipment just a screwdriver set and a few household items. It has a full set of videos and a guide to take you through each step with ease. It assumes that you are a complete novice, not one single item or process is left out. There is a customer service that you can contact to answer any questions that you may have.
If you do this fix following the videos you will have a working xbox. The fix is permanent.
James Dean 3Red Light Fix Review
This repair guide has eight high
definition videos that cover each step of the repair. Every detail is
shown and explained. Included is a 45 page ebook containing 81 photos
that you can refer to after viewing the videos.
A brief description of each of the eight videos is shown next. The photos are still shots from the actual videos in the guide. I had to reduce their size by 8% to make them fit on this page.
Video 1: 360 Case Disassembly - 7 min 43 sec
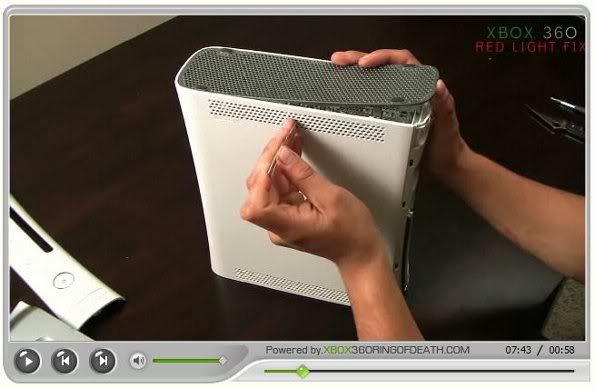
Disassembly is shown with the removal of the hard drive, face plate, side panels, the bottom case cover, the eject button, and the top case cover. This is followed by removal of the CD drive, fan shroud, and then the fans.
---------------------------------------------------------------------------------------------------
Video 2: Motherboard Extraction - 1 min 35 sec
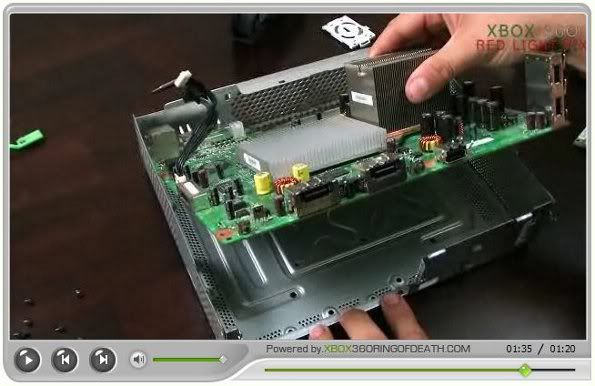
The motherboard extraction video shows the removal of eight screws, the plastic cover for the lights, the RF module, and finally the removal of the motherboard itself from the casing.
---------------------------------------------------------------------------------------------------
Video 3: Removing X-clamps & Heatsinks - 1 min 59 sec

X-clamp removal is demonstrated followed by heat sink extraction.
---------------------------------------------------------------------------------------------------
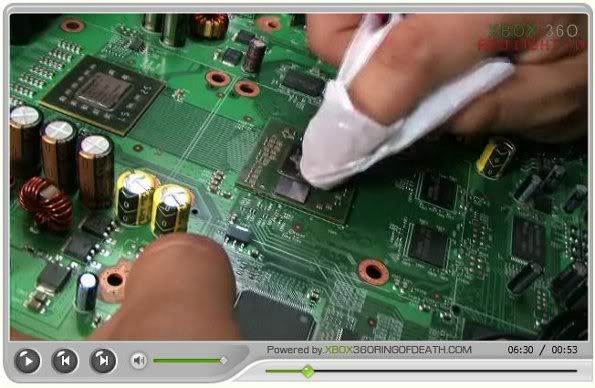
Video 4: Cleaning Thermal Paste - 4 min 40 sec
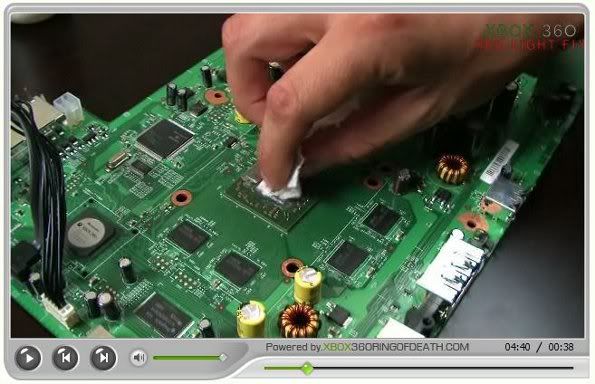
The old thermal paste is cleaned off of the CPU, GPU, and the heat sinks using thermal paste removal fluid. Thermal surface purifier is applied to the CPU, GPU, and the heat sinks to further clean the contact surfaces.
---------------------------------------------------------------------------------------------------
Video 5: Applying Thermal Paste - 2 min 41 sec
The proper technique for applying new thermal paste to the CPU and GPU are demonstrated in this video.
---------------------------------------------------------------------------------------------------
Video 6: X-clamp Modification - 6 min 30 sec
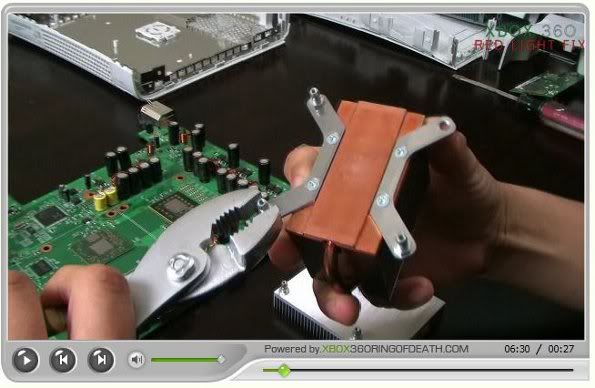
The mounting screws are removed from both heat sinks. The heat sinks are bolted back into the motherboard using a different set of screws and washers. The x-clamps are not used anymore.
---------------------------------------------------------------------------------------------------
Video 7: Baker mod - 4 min 57 sec
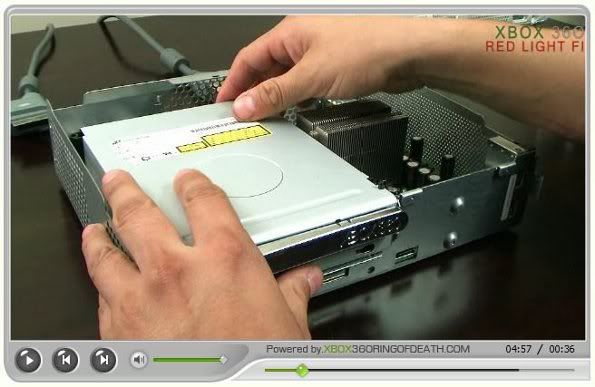
This video shows the procedure for making the solder balls under the GPU melt. This will ensure a good connection between the motherboard and the GPU.
---------------------------------------------------------------------------------------------------
Video 8: 360 Reassembly - 7 min 32 sec
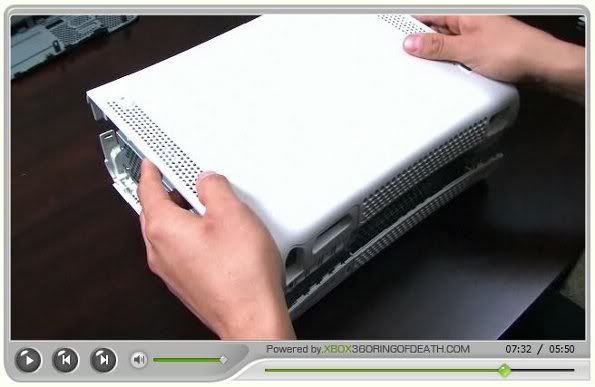
There is no need to remember how the parts are supposed to fit back together because this video will show you the exact sequence for reassembly.
Some tips on using this guide:
1.) Follow every step in the correct order as shown in the guide. Don't improvise. Use the exact screws and washers specified. The screw thread and lengths are important. So are the thickness and the material of the washers. Some of the washers are non-metallic and there is a reason for this: they don't conduct electricity.
2.) Have all the tools and hardware ready before you start the repair.
3.) Make sure your work area is not on a carpet. Static electricity is can damage the internal components of your Xbox 360.
4.) Place the screws and washers in a bag so they don't get lost.
5.) Preview the video and then read the corresponding page in the ebook before starting each step of the repair. Pay attention to any warnings printed in red.
6.) Don't pull the casing apart until the tabs in the front and the back have been released. See the second photo on page 13 in the ebook.
7.) When removing the x-clamps look carefully at the second photo on page 24 of the ebook. You must pry your screw driver between the gap indicated. Don't ever lever against any of the board components.
8.) Don't forget to position and plug in the fans as shown on page 39 top photo in the ebook. You must do this for the baker mod step to work.
9.) If you are using a PC computer, there is a trick you can use to change the size of the videos. First, click anywhere outside the video. Then use ctrl + to zoom in on the video and use ctrl - to zoom out. If this doesn't work, it's because you did not click outside of the video boundary.
A brief description of each of the eight videos is shown next. The photos are still shots from the actual videos in the guide. I had to reduce their size by 8% to make them fit on this page.
Video 1: 360 Case Disassembly - 7 min 43 sec
Disassembly is shown with the removal of the hard drive, face plate, side panels, the bottom case cover, the eject button, and the top case cover. This is followed by removal of the CD drive, fan shroud, and then the fans.
---------------------------------------------------------------------------------------------------
Video 2: Motherboard Extraction - 1 min 35 sec
The motherboard extraction video shows the removal of eight screws, the plastic cover for the lights, the RF module, and finally the removal of the motherboard itself from the casing.
---------------------------------------------------------------------------------------------------
Video 3: Removing X-clamps & Heatsinks - 1 min 59 sec
X-clamp removal is demonstrated followed by heat sink extraction.
---------------------------------------------------------------------------------------------------
Video 4: Cleaning Thermal Paste - 4 min 40 sec
The old thermal paste is cleaned off of the CPU, GPU, and the heat sinks using thermal paste removal fluid. Thermal surface purifier is applied to the CPU, GPU, and the heat sinks to further clean the contact surfaces.
---------------------------------------------------------------------------------------------------
Video 5: Applying Thermal Paste - 2 min 41 sec
The proper technique for applying new thermal paste to the CPU and GPU are demonstrated in this video.
---------------------------------------------------------------------------------------------------
Video 6: X-clamp Modification - 6 min 30 sec
The mounting screws are removed from both heat sinks. The heat sinks are bolted back into the motherboard using a different set of screws and washers. The x-clamps are not used anymore.
---------------------------------------------------------------------------------------------------
Video 7: Baker mod - 4 min 57 sec
This video shows the procedure for making the solder balls under the GPU melt. This will ensure a good connection between the motherboard and the GPU.
---------------------------------------------------------------------------------------------------
Video 8: 360 Reassembly - 7 min 32 sec
There is no need to remember how the parts are supposed to fit back together because this video will show you the exact sequence for reassembly.
Some tips on using this guide:
1.) Follow every step in the correct order as shown in the guide. Don't improvise. Use the exact screws and washers specified. The screw thread and lengths are important. So are the thickness and the material of the washers. Some of the washers are non-metallic and there is a reason for this: they don't conduct electricity.
2.) Have all the tools and hardware ready before you start the repair.
3.) Make sure your work area is not on a carpet. Static electricity is can damage the internal components of your Xbox 360.
4.) Place the screws and washers in a bag so they don't get lost.
5.) Preview the video and then read the corresponding page in the ebook before starting each step of the repair. Pay attention to any warnings printed in red.
6.) Don't pull the casing apart until the tabs in the front and the back have been released. See the second photo on page 13 in the ebook.
7.) When removing the x-clamps look carefully at the second photo on page 24 of the ebook. You must pry your screw driver between the gap indicated. Don't ever lever against any of the board components.
8.) Don't forget to position and plug in the fans as shown on page 39 top photo in the ebook. You must do this for the baker mod step to work.
9.) If you are using a PC computer, there is a trick you can use to change the size of the videos. First, click anywhere outside the video. Then use ctrl + to zoom in on the video and use ctrl - to zoom out. If this doesn't work, it's because you did not click outside of the video boundary.
James Dean 3Red Light Fix - Pro's and Con's
The step by step videos are very clear about what you have to do and leave nothing out. This is a double edged sword because this kind of clarity can have one of two effects on people: it will either scare them away or it will guide them precisely though their repair.Con's - The bad news is that you will be taking your Xbox apart with your own two hands. This has been mentioned before in this lens but the reality of it doesn't sink in until people have already purchased this product and start to assemble the tools to do the job. Many people will feel that they are in over their heads. Take a careful look at the photos in the above review. Can you picture yourself doing this?
Pro's - Most cases of the red ring of death will be repaired by the procedure given in this product. Many people have successfully done so including kids (who often enjoy taking things apart away). If you can get more mileage out of a machine you're about to throw away, then the product makes sense. This product comes with a 60 day money back guaranty.